搜索到
1807
篇与
的结果
-
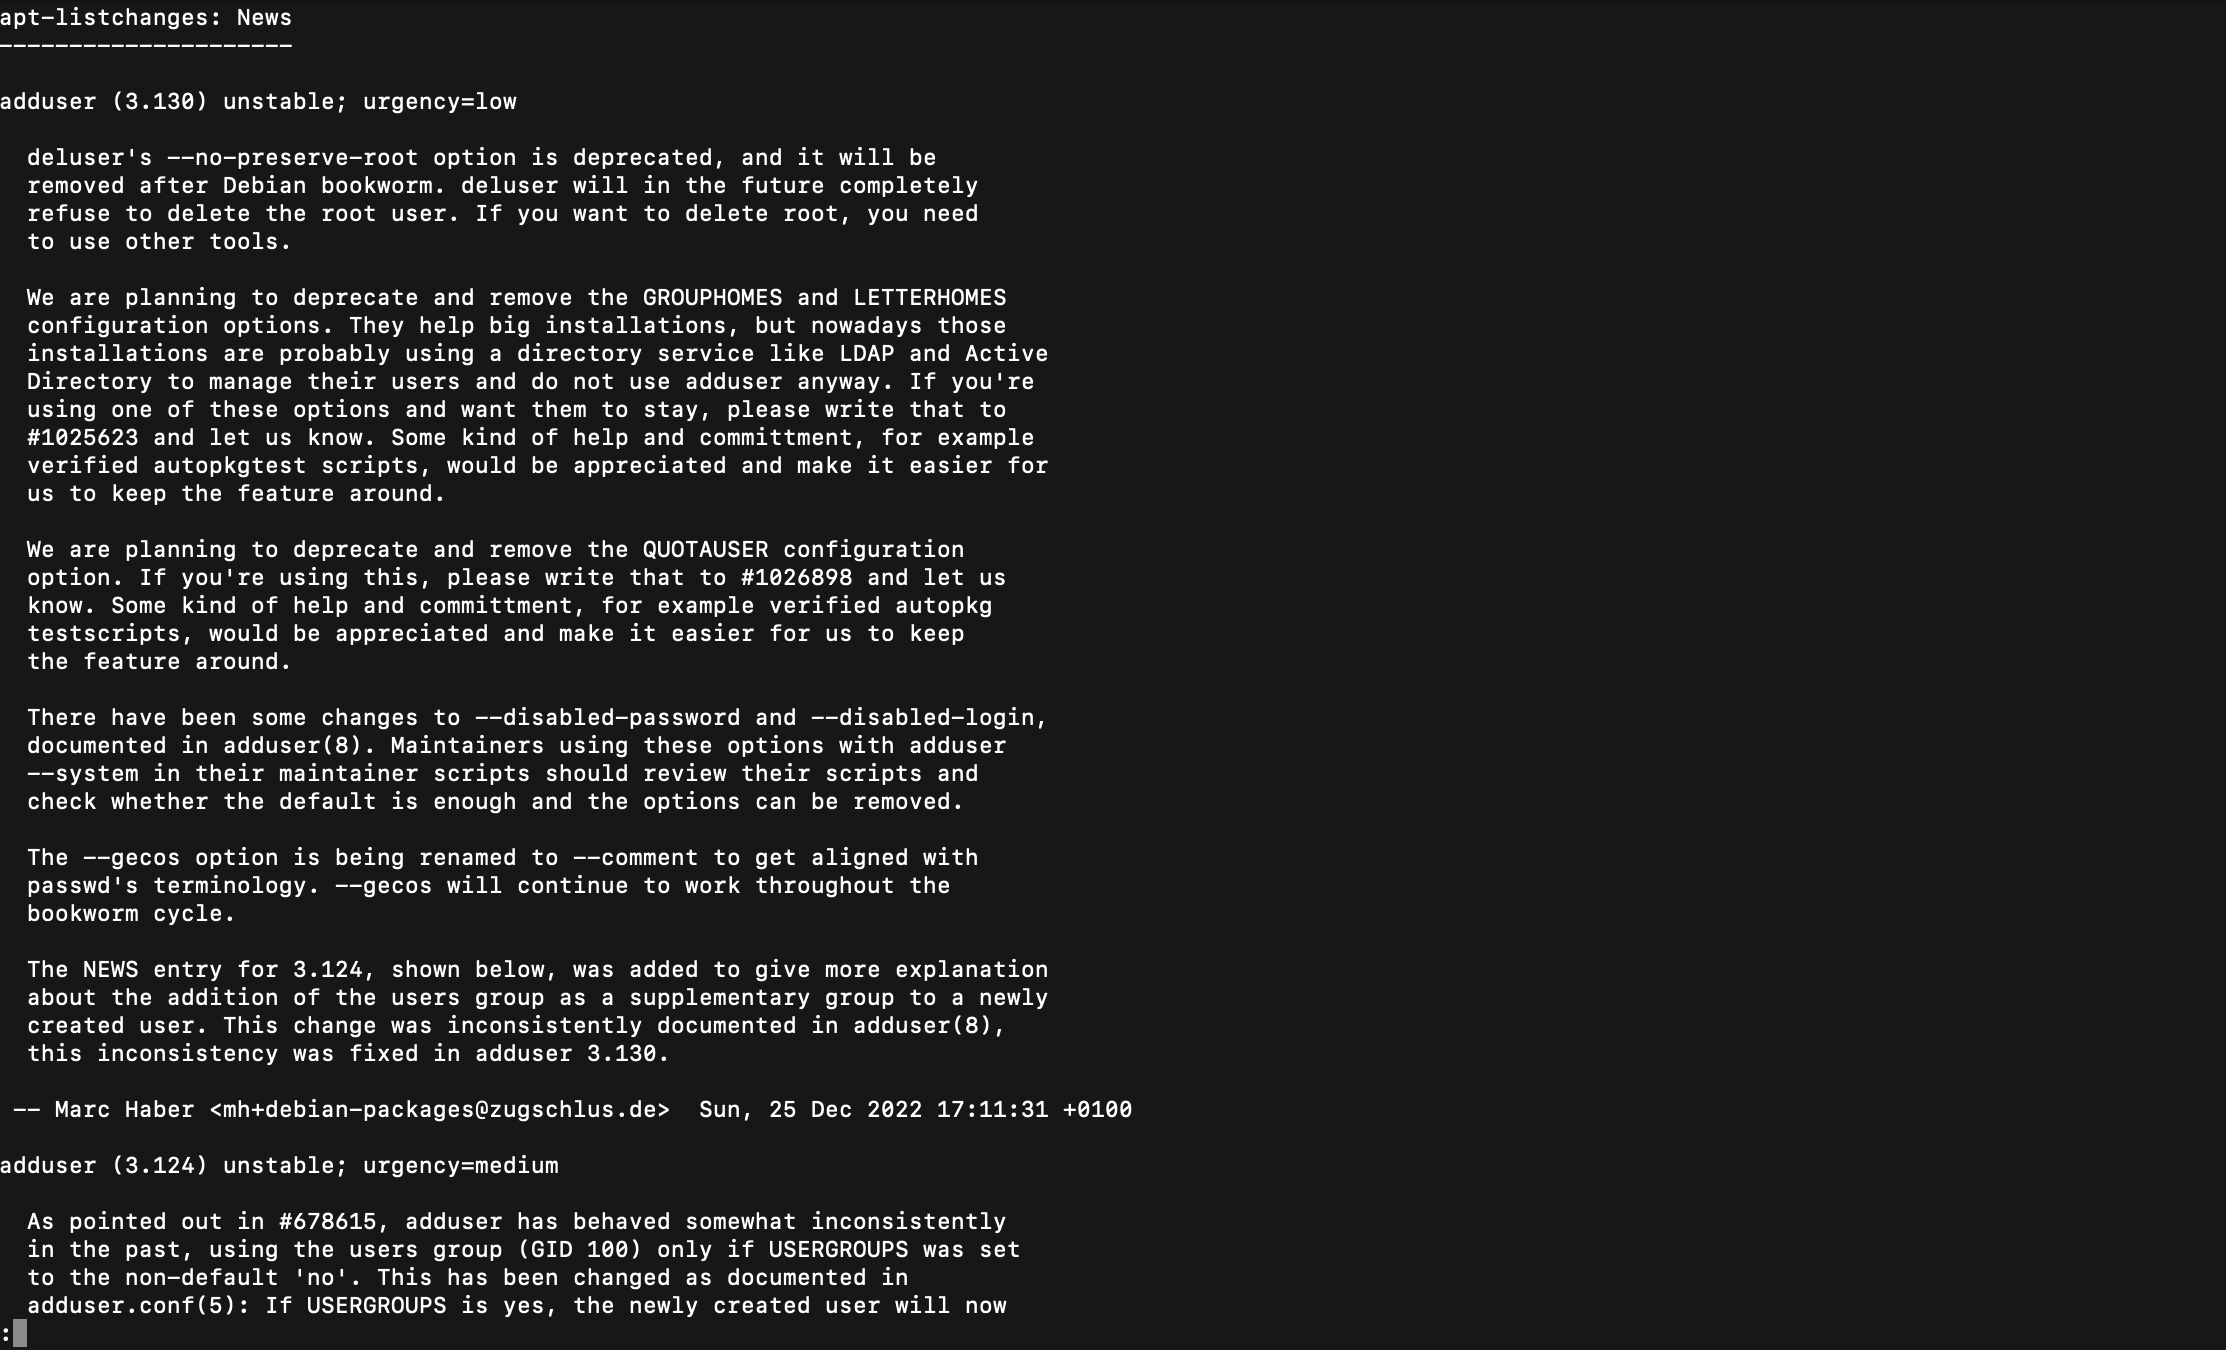
 Debian 11 Bullseye 升级 Debian 12 Bookworm 本文将指导如何升级 Debian 11 Bullseye 到 Debian 12 Bookworm。相关教程:Debian 10 Buster 升级 Debian 11 Bullseye。准备工作除非你是物理服务器,以及没有用过奇奇怪怪定制或修改的内核的 KVM 构架的 VPS 和云主机,否则升级大版本更新内核是有一定机率导致 Grub 加载失败的,切记备份重要数据!OpenVZ 6 和 LXC 构架的 VPS 是无法升级的,因为他们没有自己独立的内核再强调一遍,一定要备份重要数据!以下操作需要在 root 用户下完成,请使用 sudo -i 或 su root 切换到 root 用户进行操作更新系统首先需要更新你当前的系统apt update apt upgrade -y apt dist-upgrade -y apt autoclean apt autoremove -y 如果内核更新了,可以重启让最新的内核生效,也可以直接进行升级。升级系统首先更新 apt 源,替换 bullseye 为 bookworm:sed -i 's/bullseye/bookworm/g' /etc/apt/sources.list sed -i 's/bullseye/bookworm/g' /etc/apt/sources.list.d/*.list 对于 Debian 12 以后的版本,所有 Debian 可以分发的打包的非自由固件二进制文件 (non-free),比如某些驱动,都被转移到 Debian Archive 中的一个新组件,称为非自由固件 (non-free-firmware)。如果您从旧版的 Debian 升级,并且需要这些固件二进制文件,您应该更新您系统上的 /etc/apt/sources.list,以使用这个新组件 (来源):sed -i 's/non-free/non-free non-free-firmware/g' /etc/apt/sources.list 默认的系统 apt 源文件 /etc/apt/sources.list 应该是类似这样的:deb http://deb.debian.org/debian bookworm main contrib non-free non-free-firmware deb http://security.debian.org/debian-security bookworm-security main contrib non-free non-free-firmware deb http://deb.debian.org/debian bookworm-updates main contrib non-free non-free-firmware 大部分 Debian 的软件源配置文件使用传统的 One-Line-Style,路径为 /etc/apt/sources.list;但是对于容器镜像,从 Debian 12 开始,其软件源配置文件变更为 DEB822 格式,路径为 /etc/apt/sources.list.d/debian.sources:(参考)Types: deb URIs: https://deb.debian.org/debian Suites: bookworm bookworm-updates bookworm-backports Components: main contrib non-free non-free-firmware Signed-By: /usr/share/keyrings/debian-archive-keyring.gpg Types: deb URIs: http://security.debian.org/debian-security Suites: bookworm-security Components: main contrib non-free non-free-firmware Signed-By: /usr/share/keyrings/debian-archive-keyring.gpg 国内服务器可以替换 deb.debian.org 和 security.debian.org 为 mirrors.tuna.tsinghua.edu.cn然后我们再次执行更新系统:apt update apt upgrade -y apt dist-upgrade -y 更新过程种会提示一些软件是否需要自动重启,选 Yes 即可,以及一些软件的配置文件是否需要更新,按照自己的情况选择即可,默认回车即视为使用旧的配置文件,一般会出现在 OpenSSH 等软件的更新上。在 apt-listchanges: News 界面可以按 q 退出:提示是否自动重启服务:提示是否更新 OpenSSH 配置文件:注意某些软件更新后可能会更新 systemd 服务配置,此时我们可以执行 systemctl daemon-reload 重新加载配置。如果升级的时候遇到了如下错误:Setting up dbus-daemon (1.14.6-1) ... UUID file '/var/lib/dbus/machine-id' should contain a hex string of length 32, not length 0, with no other text dpkg: error processing package dbus-daemon (--configure): installed dbus-daemon package post-installation script subprocess returned error exit status 1 dpkg: dependency problems prevent configuration of dbus: dbus depends on dbus-daemon (= 1.14.6-1); however: Package dbus-daemon is not configured yet. dpkg: error processing package dbus (--configure): dependency problems - leaving unconfigured Processing triggers for libc-bin (2.36-9) ... Errors were encountered while processing: dbus-daemon dbus E: Sub-process /usr/bin/dpkg returned an error code (1) 删除 /var/lib/dbus/machine-id 这个空文件后重新执行命令即可,升级 dbus 时会自动生成这个文件。rm -rf /var/lib/dbus/machine-id 更新后删除不必要的软件和依赖:apt autoclean apt autoremove -y 然后我们使用 reboot 命令重启系统,耐心等待后,查看最新的系统版本:root@debian ~ # cat /etc/debian_version 12.5 root@debian ~ # lsb_release -a No LSB modules are available. Distributor ID: Debian Description: Debian GNU/Linux 12 (bookworm) Release: 12 Codename: bookworm root@debian ~ # uname -a Linux debian 6.1.0-21-amd64 #1 SMP PREEMPT_DYNAMIC Debian 6.1.90-1 (2024-05-03) x86_64 GNU/Linux 这时我们就已经更新到了最新的 Debian 12 Bookworm 和内核了。
 -
Debian 12 / Ubuntu 24.04 开启 SSH 的 RSA Key 登录 本文将指导如何在 Debian 12 和 Ubuntu 24.04 开启 SSH 的 RSA Key 登录。自从 OpenSSH 8.3 开始,RSA Key 登录默认被禁用,并被认为不安全。所以自从 Ubuntu 22.04 和 Debian 12 开始,如果某些古老的业务需要使用 RSA Key 登录,你需要手动开启 RSA Key 登录。开启 RSA Key 登录我们不需要修改 /etc/ssh/sshd_config 这个系统默认的 SSH 配置文件,只需要添加一个 /etc/ssh/sshd_config.d/enable_rsa_keys.conf 配置文件即可:cat > /etc/ssh/sshd_config.d/enable_rsa_keys.conf << EOF HostKeyAlgorithms +ssh-rsa PubkeyAcceptedKeyTypes +ssh-rsa EOF 重启 SSH 服务然后重启 SSH 服务即可:systemctl status ssh 或systemctl restart sshd 这两个服务在 Debian 12 下都是一样的:root@debian ~ # systemctl status ssh.service ● ssh.service - OpenBSD Secure Shell server Loaded: loaded (/lib/systemd/system/ssh.service; enabled; preset: enabled) Active: active (running) since Fri 2023-06-09 16:54:43 UTC; 15min ago 对比root@debian ~ # systemctl status sshd ● ssh.service - OpenBSD Secure Shell server Loaded: loaded (/lib/systemd/system/ssh.service; enabled; preset: enabled) Active: active (running) since Fri 2023-06-09 16:54:43 UTC; 15min ago 我们可以看到 sshd 其实是 ssh 服务的别称:root@debian ~ # cat /lib/systemd/system/ssh.service | grep Alias Alias=sshd.service 此时您就可以使用 RSA Key 登录 SSH 了。
-
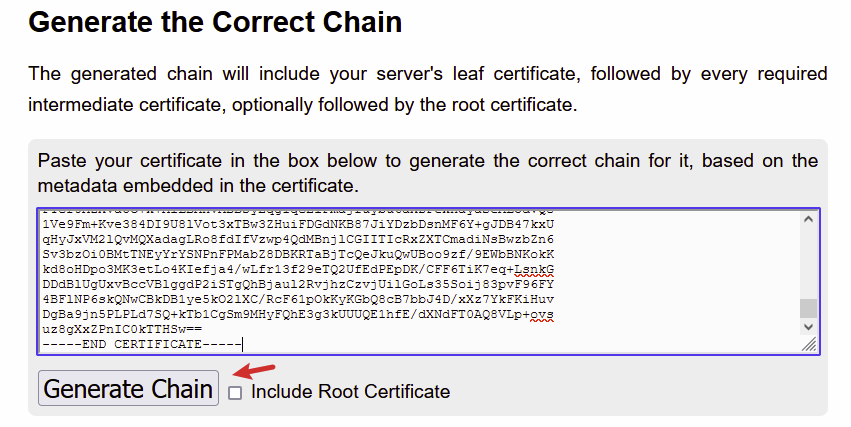
Nginx 配置 SSL 证书 本文将介绍购买 SSL 证书并在 Nginx 配置的姿势。免费证书和收费证书的区别首先,免费的 SSL 证书是没有保险的,也没有 SLA 保障,适合个人项目以及短期的网站,对于长期运营的网站来说,我们并不推荐使用免费的 SSL 证书,这时候您就需要购买一个收费的 SSL 证书。如果您需要免费证书,您可以在 FreeSSL 获取一年的 TrustAsia 证书,您也可以使用 ACME 获取 3 个月的 Let's Encrypt 或 ZeroSSL 证书。对于普通网站来说,我们推荐 Riven Cloud 的 SSL DV 证书,单域名仅需 $4 美元一年,泛域名也就是俗称 “野卡” 证书也仅需 $40 美元一年,这个价格是比较实惠的。对于商业网站来说,推荐购买 OV 证书,价格虽贵,但是更有保障,毕竟需要验证组织才签发证书,而普通的 DV 证书仅需要验证域名即可签发。生成证书签发请求 (CSR)您必须拥有一个证书签发请求 (Certificate Signing Request,CSR) 才能申请签发 SSL 证书。这里我们使用 OS X,Linux,UNIX 及类似系统为例,UNIX 系操作系统一般已经内置了 OpenSSL 或 GnuTLS 工具链,您需要系统中存在 openssl 的可执行文件:apt install openssl dnf install openssl pacman -S openssl zypper in openssl 交互式生成 CSR首先生成一个 CSR,这个 CSR 将会用于请求 SSL 证书,这里以 2048 位 RSA 证书为例:openssl req -new -newkey rsa:2048 -sha256 -nodes -out example_com.csr -keyout example_com.key -subj "/C=CN/ST=Beijing/L=Beijing/O=Example Inc/OU=Network Dept/CN=example.com" 代码含义C国别代码ST省份、州L城市O公司名OU部门名CNCommon Name,一般是需要签发证书的域名如果您准备签发泛域名证书,则使用 *.example.com 作为 CN (common name):openssl req -new -newkey rsa:2048 -sha256 -nodes -out example_com.csr -keyout example_com.key -subj "/C=CN/ST=Beijing/L=Beijing/O=Example Inc/OU=Network Dept/CN=*.example.com" 如果您希望生成 ECC 证书,命令看起来像这样:openssl ecparam -out example_com.key -name prime256v1 -genkey && openssl req -new -key example_com.key -nodes -out example_com.csr -subj "/C=CN/ST=Beijing/L=Beijing/O=Example Inc/OU=Network Dept/CN=example.com" 如果您准备签发的是多域名证书,请使用下面的命令将所有的域名包含进去openssl req -new -newkey rsa:2048 -sha256 -nodes -out example_com.csr -keyout example_com.key -subj "/C=CN/ST=Beijing/L=Beijing/O=Example Inc/OU=Network Dept/CN=example.com/subjectAltName=DNS.1=sub1.example.com,DNS.2=sub2.example.com,DNS.3=sub.another-example.com" 如果您准备签发的是 IP 证书,则留空 CN (common name)openssl req -new -newkey rsa:2048 -sha256 -nodes -out example_com.csr -keyout example_com.key -subj "/C=CN/ST=Beijing/L=Beijing/O=Example Inc/OU=Network Dept/CN=/subjectAltName=DNS.1=192.0.2.1,DNS.2=192.0.2.2" 购买下单并获取证书文件所有网站购买证书的流程都是一样的,提交 example_com.csr 文件内容,然后填写相关资料,付款,等待邮件通知验证,验证后开通即可。按照 CA/Browser Forum 的规定,普通 DV 单域名或多域名证书验证方式可选 HTTP/HTTPS,域名管理员邮箱以及 DNS 记录 (通常是 TXT 或 CNAME 记录) 进行验证,对于泛域名证书,目前有且仅支持 DNS 记录验证。按照 CA/Browser Forum 的还有一条规定,所有 SSL 证书有效期不得大于 13 个月 (397 天),所有市面上的收费或免费证书都不能超过这个有效期,骗你可以买两年五年证书的都是忽悠你的,实际就是先给你签发一年,第二年免费给你续费,续费的流程和重新签发的流程是一样的,需要重新验证你的域名或组织。这里不多叙述,购买完成后您会得到一个类似 example_com.crt 的文件,这个文件里面包含了证书的公钥,以及证书的其他信息,比如有效期,域名,签发者等等,需要注意的是这个证书链一般是不完整的,也有的商家会发送你完整的证书链,如果你强行配置在 Nginx 上,会造成个别浏览器提示证书错误,这时候可以使用 What's My Chain Cert 这个服务,把 crt 文件内容复制上去,然后下载完整的证书链:这时候会得到一个类似 example_com.chain.crt 的文件,我们把 example_com.key 和 example_com.chain.crt 丢入服务器。此时记得打开 example_com.chain.crt 文件,把除了 example_com.crt 内容以外的 CA 根证书单独命名为一个单独的文件 example_com.ca.crt我们最终得到如下文件:文件名用途/etc/nginx/ssl/example_com.key本地或者服务器上使用 OpenSSL 生出来的证书私钥/etc/nginx/ssl/example_com.crt服务商给你的证书公钥,没用了,可以丢了/etc/nginx/ssl/example_com.chain.crt这个才是完整证书链/etc/nginx/ssl/example_com.ca.crtCA 根证书记得把他们丢在你服务器上,比如创建并放在 /etc/nginx/ssl 目录。配置 Nginx SSL 证书开启 HTTPS如果您按照本站的教程使用烧饼博客打包的 Nginx,那么可以参考如下配置,请注意,只有默认的第一个监听端口的网站才可以在 listen 段使用 default_server 和 reuseport,如果需要添加更多网站,请删除这两个参数:跳转所有的 HTTP 请求:server { listen 80 default_server; listen [::]:80 default_server; location / { return 301 https://$host$request_uri; } } 生成 dhparam 文件:madir -p /etc/nginx/ssl openssl dhparam -dsaparam -out /etc/nginx/ssl/dhparam 2048 嫌弃慢的也可以直接用 Mozilla 给你生成好的:curl https://ssl-config.mozilla.org/ffdhe2048.txt > /etc/nginx/ssl/dhparam 然后监听 443 端口并开启 HTTP/2、HTTP/3、OCSP、TLS 1.2、TLS 1.3 和 HSTS Preload:我们以 example.com 为例,网站目录位于 /var/www/example.comserver { listen 443 ssl default_server; listen [::]:443 ssl default_server; # 开启 HTTP/3 listen 443 quic reuseport; listen [::]:443 quic reuseport; # 开启 HTTP/2 http2 on; server_name example.com; root /var/www/example.com; index index.html; ssl_certificate /etc/nginx/ssl/example_com.chain.crt; ssl_certificate_key /etc/nginx/ssl/example_com.key; ssl_trusted_certificate /etc/nginx/ssl/example_com.ca.crt; ssl_session_timeout 1d; ssl_session_cache shared:SSL:10m; ssl_session_tickets off; ssl_dhparam /etc/nginx/ssl/dhparam; ssl_protocols TLSv1.2 TLSv1.3; ssl_ciphers ECDHE-ECDSA-AES128-GCM-SHA256:ECDHE-RSA-AES128-GCM-SHA256:ECDHE-ECDSA-AES256-GCM-SHA384:ECDHE-RSA-AES256-GCM-SHA384:ECDHE-ECDSA-CHACHA20-POLY1305:ECDHE-RSA-CHACHA20-POLY1305:DHE-RSA-AES128-GCM-SHA256:DHE-RSA-AES256-GCM-SHA384; ssl_prefer_server_ciphers off; add_header Alt-Svc 'h3=":443"; ma=86400'; add_header Referrer-Policy strict-origin-when-cross-origin; add_header Strict-Transport-Security "max-age=63072000; includeSubDomains; preload"; add_header X-Frame-Options SAMEORIGIN; add_header X-Content-Type-Options nosniff; add_header X-XSS-Protection "1; mode=block"; ssl_stapling on; ssl_stapling_verify on; # 国内机器请自行修改 DNS resolver 1.1.1.1 8.8.8.8 valid=300s; resolver_timeout 10s; } 然后测试 Nginx 配置并重新加载:nginx -t nginx -s reload 最终你就可以在浏览器打开 https://example.com/ 查看是否生效了。
-
Debian 12 / Ubuntu 24.04 下体验 HTTP/3 协议的 Nginx QUIC 本文同样适合 Debian 11 和 Ubuntu 22.04,请使用 root 用户进行操作。1、什么是 HTTP/3 和 QUIC?HTTP/3 是一种基于 QUIC (Quick UDP Internet Connections) 协议的 HTTP 协议版本,它是 HTTP/2 的后继者,旨在改进 Web 性能和安全性。HTTP/3 与之前的 HTTP 协议有很大的不同,最明显的区别是它使用 QUIC 协议而不是 TCP 协议来传输数据。QUIC 是一种由 Google 开发的协议,基于 UDP,它在保持安全性的同时提供更快的连接和更少的延迟。与 TCP 不同,QUIC 允许多个请求同时在同一连接上进行,从而减少了网络拥塞和握手延迟的影响。总的来说,HTTP/3 的设计目标是通过减少延迟和提高性能,为 Web 应用程序提供更快、更安全和更高效的用户体验。2、安装 Nginx Quic这里我们推荐烧饼博客团队打包的 Nginx Quic 版本,它是基于最新的官方 1.25.0 源码打包的,支持 HTTP/3 和 QUIC 协议。2.1 更新系统并安装部分必要软件apt update apt upgrade -y apt dist-upgrade -y apt install curl vim wget gnupg dpkg apt-transport-https lsb-release ca-certificates 2.2 增加 GPG Keycurl -sSL https://n.wtf/public.key | gpg --dearmor > /usr/share/keyrings/n.wtf.gpg 2.3 添加 Nginx QUIC 源echo "deb [arch=$(dpkg --print-architecture) signed-by=/usr/share/keyrings/n.wtf.gpg] https://mirror-cdn.xtom.com/sb/nginx/ $(lsb_release -sc) main" > /etc/apt/sources.list.d/n.wtf.list 如果你的服务器在国内,可以使用下面的源:echo "deb [arch=$(dpkg --print-architecture) signed-by=/usr/share/keyrings/n.wtf.gpg] https://mirror.iscas.ac.cn/sb/nginx/ $(lsb_release -sc) main" > /etc/apt/sources.list.d/n.wtf.list 或echo "deb [arch=$(dpkg --print-architecture) signed-by=/usr/share/keyrings/n.wtf.gpg] https://mirror.nju.edu.cn/sb/nginx/ $(lsb_release -sc) main" > /etc/apt/sources.list.d/n.wtf.list 2.4 更新并安装 Nginxapt update apt install nginx-extras -y 安装完毕后,我们可以使用 nginx -V 命令看到 Nginx 已经是最新的 1.27.0 主线版 + QUIC 了:root@debian ~ # nginx -V nginx version: nginx-n.wtf/1.27.0 built with OpenSSL 3.3.1 4 Jun 2024 TLS SNI support enabled 2.5 使用 Docker 安装你也可以使用 Docker 进行体验:docker run --name nginx --net host --restart always -v $HOME/nginx-config:/usr/src/docker-nginx/conf:ro -d ghcr.io/u-sb/nginx 此时配置文件的目录在当前目录的 nginx-config 文件夹下。3、配置 Nginx首先,HTTP/3 仅支持 HTTPS 协议,因此我们需要准备好 SSL 证书,可以参考《Nginx 配置 SSL 证书》获取 SSL 证书。其次,需要开启 TLS 1.3 支持,因为 HTTP/3 是基于 TLS 1.3 的,如果没有开启 TLS 1.3,那么 HTTP/3 将无法正常工作。最后,需要添加 listen 443 http3 监听端口并开启 HTTP/3 支持,以及需要添加一个 Alt-Svc 的头部信息 add_header Alt-Svc 'h3=":443"; ma=86400';,用于告诉浏览器使用 HTTP/3 协议访问网站。最后,需要添加 listen 443 quic 监听端口并开启 HTTP/3 支持,以及需要添加一个 Alt-Svc 的头部信息 add_header Alt-Svc 'h3=":$server_port"; ma=86400';,用于告诉浏览器使用 HTTP/3 协议访问网站。因为这个修改,从 Nginx 1.25.0 开始,已经不支持 http3 的 listen 段,需要改为 quic。另外,从 Nginx 1.25.1 开始,listen ... http2 已废弃,需要改为 http2 on,否则会报警告 nginx: [warn] the "listen ... http2" directive is deprecated, use the "http2" directive instead:我们附上一个基本的配置示例:server { listen 443 ssl default_server; listen [::]:443 ssl default_server; # 开启 HTTP/3 listen 443 quic reuseport; listen [::]:443 quic reuseport; # 开启 HTTP/2 http2 on; server_name example.com; root /var/www/example.com; index index.html; ssl_certificate /etc/nginx/ssl/example.com.crt; ssl_certificate_key /etc/nginx/ssl/example.com.key; ssl_trusted_certificate /etc/nginx/ssl/example.com.ca.crt; ssl_session_timeout 1d; ssl_session_cache shared:MozSSL:10m; ssl_session_tickets off; ssl_protocols TLSv1.3; ssl_prefer_server_ciphers off; ssl_stapling on; ssl_stapling_verify on; resolver 1.1.1.1 8.8.8.8 valid=300s; resolver_timeout 10s; add_header Alt-Svc 'h3=":$server_port"; ma=86400'; add_header X-protocol $server_protocol always; } 请注意 listen 443 quic reuseport 里的 reuseport 参数,以及 listen 443 ssl default_server 里的 default_server 参数,所有 server 段里,只允许一个段出现 reuseport 和 default_server 参数,否则会报错。另外 listen 段里的 ssl 无法和 quic 放一起,必须分开写两段。4、测试 HTTP/3我们使用 Firefox 浏览器,因为目前 DNS SVCB/HTTPS 记录尚未普及,所以第一次访问的时候,浏览器还是走 TCP 协议使用 HTTP/2 或者 HTTP/1.1 请求你的网站,获取 Alt-Svc 的头部信息后,才会走 HTTP/3 协议,所以第一次访问以后,可以关掉浏览器重新打开再测试。我们可以打开 F12 开发者工具,查看 Network 选项卡,可以看到 HTTP/3 协议的请求:
-
Debian 12 安装 Nextcloud 服务端 本文将指导如何在 Debian 12 下安装并配置 Nextcloud 服务端。PS:本文同时适用于 Debian 10 Buster 以及 Ubuntu 20.04 Focal什么是 Nextcloud?Nextcloud 是一套用于建立网络硬盘的客户端和服务器软件。其功能和 Dropbox 相近,但 Nextcloud 是开源的,任何人都可以在自己的服务器上安装并运行它。虽然 Nextcloud 性能比较弱,但是实际测试下来几个人的小团队用用也足够了。准备环境由于 Nextcloud 消耗资源比较大,一般我们不建议在 4GB 内存以下的 VPS 安装,官方推荐配置为 512MB 内存,实际体验下来安装在 8GB 内存上跑 Nextcloud 会比较流畅。配置 LEMP 环境首先,可以参考本站教程配置好 LEMP 环境,在安装 PHP 的时候,请选择 PHP 8.3 以及以下模块:apt install php8.3-common php8.3-fpm php8.3-mysql php8.3-curl php8.3-gd php8.3-mbstring php8.3-xml php8.3-xmlrpc php8.3-zip php8.3-bz2 php8.3-intl php8.3-ldap php8.3-smbclient php8.3-bcmath php8.3-gmp php8.3-imap php8.3-opcache php8.3-imagick redis-server php8.3-redis -y 这里我们使用了 Redis 作为缓存,所以需要安装 redis-server 和 php8.3-redis,请不要直接安装 php-redis,否则系统会默认把所有的 PHP 版本都给你安装一遍哦。优化 PHP-FPM 设置由于默认的 PHP-FPM 设置只适合小型应用,不适合 Nextcloud 这种消耗资源比较大的程序,所以我们可以修改如下参数,这里的例子是你想设置最大上传的文件为 10GB:sed -i 's/;cgi.fix_pathinfo=1/cgi.fix_pathinfo=0/' /etc/php/8.3/fpm/php.ini sed -i 's/upload_max_filesize = 2M/upload_max_filesize = 10240M/' /etc/php/8.3/fpm/php.ini sed -i 's/post_max_size = 8M/post_max_size = 10240M/' /etc/php/8.3/fpm/php.ini sed -i 's/memory_limit = 128M/memory_limit = 512M/' /etc/php/8.3/fpm/php.ini sed -i 's/#opcache.interned_strings_buffer=8/opcache.interned_strings_buffer=16/' /etc/php/8.3/fpm/php.ini sed -i 's/;listen.mode = 0660/listen.mode = 0660/' /etc/php/8.3/fpm/pool.d/www.conf sed -i 's/pm.max_children = 5/pm.max_children = 20/' /etc/php/8.3/fpm/pool.d/www.conf sed -i 's/pm.start_servers = 2/pm.start_servers = 4/' /etc/php/8.3/fpm/pool.d/www.conf sed -i 's/pm.min_spare_servers = 1/pm.min_spare_servers = 2/' /etc/php/8.3/fpm/pool.d/www.conf sed -i 's/pm.max_spare_servers = 3/pm.max_spare_servers = 8/' /etc/php/8.3/fpm/pool.d/www.conf sed -i 's/;clear_env = no/clear_env = no/' /etc/php/8.3/fpm/pool.d/www.conf 具体配置可以参考官网教程。然后我们重启 PHP-FPM 生效:systemctl restart php8.3-fpm.service 配置 Nginx我们假设你的 Nextcloud 需要安装在 /var/www/nextcloud 目录,配置的域名是 cloud.example.com,证书文件位于 /etc/nginx/ssl/cloud.example.com.crt,证书私钥位于 /etc/nginx/ssl/cloud.example.com.key,那么我们直接参考官网上的第三方教程配置 Nginx:upstream php-handler { #server 127.0.0.1:9000; server unix:/var/run/php/php8.3-fpm.sock; } # Set the `immutable` cache control options only for assets with a cache busting `v` argument map $arg_v $asset_immutable { "" ""; default "immutable"; } server { listen 443 ssl; listen [::]:443 ssl; listen 443 quic; listen [::]:443 quic; http2 on; server_name cloud.example.com; # Path to the root of your installation root /var/www/nextcloud; ssl_session_timeout 1d; ssl_session_cache shared:MozSSL:10m; # about 40000 sessions ssl_session_tickets off; # curl https://ssl-config.mozilla.org/ffdhe2048.txt > /etc/nginx/ssl/dhparam ssl_dhparam /etc/nginx/ssl/dhparam; ssl_protocols TLSv1.2 TLSv1.3; ssl_ciphers ECDHE-ECDSA-AES128-GCM-SHA256:ECDHE-RSA-AES128-GCM-SHA256:ECDHE-ECDSA-AES256-GCM-SHA384:ECDHE-RSA-AES256-GCM-SHA384:ECDHE-ECDSA-CHACHA20-POLY1305:ECDHE-RSA-CHACHA20-POLY1305:DHE-RSA-AES128-GCM-SHA256:DHE-RSA-AES256-GCM-SHA384; ssl_prefer_server_ciphers off; # OCSP stapling ssl_stapling on; ssl_stapling_verify on; resolver 1.1.1.1 8.8.8.8 valid=300s; resolver_timeout 10s; ssl_certificate /etc/nginx/ssl/cloud.example.com.crt; ssl_certificate_key /etc/nginx/ssl/cloud.example.com.key; ssl_trusted_certificate /etc/nginx/ssl/cloud.example.com.crt; # HSTS settings # WARNING: Only add the preload option once you read about # the consequences in https://hstspreload.org/. This option # will add the domain to a hardcoded list that is shipped # in all major browsers and getting removed from this list # could take several months. add_header Strict-Transport-Security "max-age=63072000; includeSubDomains; preload"; # set max upload size and increase upload timeout: client_max_body_size 10240M; client_body_timeout 300s; fastcgi_buffers 64 4K; # Enable gzip but do not remove ETag headers gzip on; gzip_vary on; gzip_comp_level 4; gzip_min_length 256; gzip_proxied expired no-cache no-store private no_last_modified no_etag auth; gzip_types application/atom+xml application/javascript application/json application/ld+json application/manifest+json application/rss+xml application/vnd.geo+json application/vnd.ms-fontobject application/wasm application/x-font-ttf application/x-web-app-manifest+json application/xhtml+xml application/xml font/opentype image/bmp image/svg+xml image/x-icon text/cache-manifest text/css text/plain text/vcard text/vnd.rim.location.xloc text/vtt text/x-component text/x-cross-domain-policy; # Pagespeed is not supported by Nextcloud, so if your server is built # with the `ngx_pagespeed` module, uncomment this line to disable it. #pagespeed off; # HTTP response headers borrowed from Nextcloud `.htaccess` add_header Referrer-Policy "no-referrer" always; add_header X-Content-Type-Options "nosniff" always; add_header X-Download-Options "noopen" always; add_header X-Frame-Options "SAMEORIGIN" always; add_header X-Permitted-Cross-Domain-Policies "none" always; add_header X-Robots-Tag "none" always; add_header X-XSS-Protection "1; mode=block" always; # Remove X-Powered-By, which is an information leak fastcgi_hide_header X-Powered-By; # Specify how to handle directories -- specifying `/index.php$request_uri` # here as the fallback means that Nginx always exhibits the desired behaviour # when a client requests a path that corresponds to a directory that exists # on the server. In particular, if that directory contains an index.php file, # that file is correctly served; if it doesn't, then the request is passed to # the front-end controller. This consistent behaviour means that we don't need # to specify custom rules for certain paths (e.g. images and other assets, # `/updater`, `/ocm-provider`, `/ocs-provider`), and thus # `try_files $uri $uri/ /index.php$request_uri` # always provides the desired behaviour. index index.php index.html /index.php$request_uri; # Rule borrowed from `.htaccess` to handle Microsoft DAV clients location = / { if ( $http_user_agent ~ ^DavClnt ) { return 302 /remote.php/webdav/$is_args$args; } } location = /robots.txt { allow all; log_not_found off; access_log off; } # Make a regex exception for `/.well-known` so that clients can still # access it despite the existence of the regex rule # `location ~ /(\.|autotest|...)` which would otherwise handle requests # for `/.well-known`. location^~ /.well-known { # The rules in this block are an adaptation of the rules # in `.htaccess` that concern `/.well-known`. location = /.well-known/carddav { return 301 /remote.php/dav/; } location = /.well-known/caldav { return 301 /remote.php/dav/; } location /.well-known/acme-challenge { try_files $uri $uri/ =404; } location /.well-known/pki-validation { try_files $uri $uri/ =404; } # Let Nextcloud's API for `/.well-known` URIs handle all other # requests by passing them to the front-end controller. return 301 /index.php$request_uri; } # Rules borrowed from `.htaccess` to hide certain paths from clients location ~ ^/(?:build|tests|config|lib|3rdparty|templates|data)(?:$|/) { return 404; } location ~ ^/(?:\.|autotest|occ|issue|indie|db_|console) { return 404; } # Ensure this block, which passes PHP files to the PHP process, is above the blocks # which handle static assets (as seen below). If this block is not declared first, # then Nginx will encounter an infinite rewriting loop when it prepends `/index.php` # to the URI, resulting in a HTTP 500 error response. location ~ \.php(?:$|/) { # Required for legacy support rewrite^/(?!index|remote|public|cron|core\/ajax\/update|status|ocs\/v[12]|updater\/.+|oc[ms]-provider\/.+|.+\/richdocumentscode\/proxy) /index.php$request_uri; fastcgi_split_path_info^(.+?\.php)(/.*)$; set $path_info $fastcgi_path_info; try_files $fastcgi_script_name =404; include fastcgi_params; fastcgi_param SCRIPT_FILENAME $document_root$fastcgi_script_name; fastcgi_param PATH_INFO $path_info; fastcgi_param HTTPS on; fastcgi_param modHeadersAvailable true; # Avoid sending the security headers twice fastcgi_param front_controller_active true; # Enable pretty urls fastcgi_pass php-handler; fastcgi_intercept_errors on; fastcgi_request_buffering off; fastcgi_max_temp_file_size 0; } location ~ \.(?:css|js|svg|gif|png|jpg|ico|wasm|tflite|map)$ { try_files $uri /index.php$request_uri; add_header Cache-Control "public, max-age=15778463, $asset_immutable"; access_log off; # Optional: Don't log access to assets location ~ \.wasm$ { default_type application/wasm; } } location ~ \.woff2?$ { try_files $uri /index.php$request_uri; expires 7d; # Cache-Control policy borrowed from `.htaccess` access_log off; # Optional: Don't log access to assets } # Rule borrowed from `.htaccess` location /remote { return 301 /remote.php$request_uri; } location / { try_files $uri $uri/ /index.php$request_uri; } } 关于 SSL 配置可以参考本站教程《Nginx 配置 SSL 证书》和《使用 acme.sh 配置自动续签 SSL 证书》。如果要修改上传文件大小限制,请求改 Nginx 配置里的 client_max_body_size 10240M; 和 PHP 配置里的 upload_max_filesize 和 post_max_size 参数,本教程举例是上传文件最大限制 10GB。检查无误后重启 Nginx 生效nginx -t nginx -s reload 安装 Nextcloud首先进入 /var/www 目录,下载并解压 Nextcloud,截止本文发布,目前的最新稳定是 29.0.x:cd /var/www wget -O nextcloud.zip https://download.nextcloud.com/server/releases/latest-29.zip unzip nextcloud.zip 然后我们设置解压出来的 nextcloud 文件夹权限和 PHP 以及 Nginx 对应,设置为 www-data 用户,因为 Debian 下默认 www-data 用户/用户组的 uid 和 gid 是 33,所以直接使用 chown 33:33 即可:chown 33:33 nextcloud -R find nextcloud/ -type d -exec chmod 750 {} \; find nextcloud/ -type f -exec chmod 640 {} \; 安装完成后,直接访问 https://cloud.example.com 填入你配置好的数据库信息以及管理员帐号密码即可登录你的 Nextcloud。配置 Redis 缓存Debian 默认安装的 redis-server 已经给你基本配置好了,只监听在本地 127.0.0.1 的 6379 端口,如果没有特殊需求不需要修改。首先,我们把 redis 用户加入 www-data 用户组:usermod -a -G redis www-data 然后修改 /var/www/nextcloud/config/config.php 文件,在最后一行 ); 字符前加入: 'memcache.locking' => '\\OC\\Memcache\\Redis', 'memcache.distributed' => '\\OC\\Memcache\\Redis', 'memcache.local' => '\\OC\\Memcache\\Redis', 'redis' => array ( 'host' => '127.0.0.1', 'port' => 6379, ), 重启 PHP-FPM 生效:systemctl restart php8.3-fpm 其他缓存方式可以参考官方文档。如果没有问题,可以访问 https://cloud.example.com/settings/admin/serverinfo 查看服务器信息了。配置 Crontab我们需要使用 Linux 内置的 cron 来运行自动化任务,直接使用 www-data 用户修改定时任务:crontab -u www-data -e 选择一款你喜欢的编辑器然后加入:*/5 * * * * /usr/bin/php -f /var/www/nextcloud/cron.php 这个命令的含义是每 5 分钟执行一次 Nextcloud 的定时任务,具体可以参考官网教程。保存后可以使用 crontab -u www-data -l 命令查看当前 www-data 用户下的定时任务。安装 Nextcloud 客户端这里就不再赘述了,直接从官网下载并安装对应操作系统的软件即可,登录的时候输入完整的网址 https://cloud.example.com/ 即可登录你自己的 Nextcloud。Nextcloud 更新如果你的用户和数据不多,直接用管理员访问 https://cloud.example.com/updater/ 即可更新到最新稳定版本。如果服务器的负载较高,可以使用命令行更新:cd /var/www/nextcloud sudo -u www-data php occ upgrade 如果自动下载网速较慢,你也可以手工更新,下载最新版本的 Nextcloud 然后解压到 /var/www/nextcloud 目录,除了 data 和 config 目录,其他都覆盖旧的文件,再执行 sudo -u www-data php /var/www/nextcloud/occ upgrade 即可。具体可以参考官网教程:更新、升级和手工升级。切记更新之前先备份数据,避免丢失重要数据哦。Nextcloud 备份Nextcloud 目前还是个典型的 PHP + MySQL 程序,所以理论上只要备份 /var/www/nextcloud 目录,你的文件储存目录 (默认在 /var/www/nextcloud/data) 以及 MySQL 数据库即可,这里不再赘述。